Ambition: thinking you can start a major project less than 48 hours before you need to have it wrapped and under the tree
Stupidity: (a) thinking the project is "quick" and "easy"; (b) not planning on time to block it
Insanity: forging ahead anyway, determined to have it finished in time
Despair: at 1 am the night before the project needs to be finished, with at least 2-3 hours of work still to be done, and immediately after sewing in the ends and cutting them, discovering that you joined the last motif backwards and twisted
Desperation: very very carefully finding the yarn end you just cut and very very gently un-sewing it from the motif so that you can just rip out and redo the last few stitches rather than having to cut the motif out and start it over from scratch
Comfort: telling yourself that took less time than cutting the motif and starting it over (this actually probably is true)
Relief: having the thing finished and blocking on your bedroom floor an hour before the recipient arrives (No, it was not dry when they needed to leave, but it was close. We used a hair dryer to speed things up at the end.)
Tears of Joy: the response from the recipient that makes it all worth it <3
Saturday, December 31, 2011
Sunday, December 18, 2011
I should probably be freaking out right now.
Or maybe more accurately, I should probably be crocheting. Christmas is a week away and I have at least 3 projects to finish, another to start, and a fifth that I won't even attempt to start before Christmas - the recipient of that one is getting a photo of the pattern and the yarn and an IOU. *blush* I think I'm still ok on time, since Jimi has taken Wed and Thurs off work and has Fri off anyway, and my plan for those days is pretty much to let him handle the toddler while I crochet like a madwoman. Except of course that 2 of those projects need to be finished by Fri because that's when we're doing Christmas with Jimi's dad. And I'm not sure how much work time I can count on on Friday.
Of course it also means that I should also be doing things like putting the laundry away and cleaning the bathroom, so there is less of it to do Wed/Thurs and I *can* spend that time crocheting instead of getting the house ready for company on Friday.
This is obviously why I have suddenly decided to post here for the first time in almost 4 months.
Yeah... I should probably be freaking out right now....
Saturday, September 3, 2011
What DYT Has Done For Me, Part 2 - Discovering My Wings
I took a deep breath and clicked on the button to choose the Type 1 course. And with that one little click, my whole world changed.
Ok, yes, I realize how melodramatic that sounds. But it's true. I didn't even realize at first just how true. And it really isn't about the fashion, either - that's really just the icing on the cake. It's new insights and breakthroughs I've had about myself that are truly exciting.
The first breakthrough I had was in trying to wrap my head around the idea that I really truly am a Type 1. Type 1 is bright, animated, upward, light, airy, random, extroverted, bubbly, enthusiastic, cute, generating ideas. Type 2 is soft, subtle, gentle, calm, flowing, introverted, sensitive, graceful, elegant, planning details. How could I possibly be both? What I needed to remember is that there is a range of levels of motion within each movement, and my unique expression is influenced by my secondary energy, my life experiences, and lots of other things unique to *me*. I am not a "textbook" Type 1 - what I call bouncy balls and fireworks. Rather, I describe my energy as "a dreamer, head in the clouds" energy. It is still a very light, airy, full of ideas energy - but it also has a soft, gentle, graceful element to it. Think Belle in Disney's Beauty & the Beast. Thinking of it in that way allowed me to start to truly accept and embrace this part of my nature in a way I hadn't been able to before.
The second breakthrough I had came when I wasn't even expecting it. Doesn't it often happen that way? Since Type 1's are so animated and enthusiastic, it is common for us to feel like we need to be more serious, or tone down our brightness so we will be taken seriously. I'd heard and read that in several places, but it never seemed to apply to me until the word responsibility came up in a separate conversation. I haven't felt that I needed to be more serious, but I have definitely felt I needed to be (more?) grown up / responsible. There were some pretty traumatic circumstances and events going on for most of my childhood, and as the oldest of my siblings, I ended up taking on a lot of responsibility at a very young age. Also, and I had never even realized this before, I think I developed a belief that in the middle of all that hurting, it wasn't ok to ever *not* feel that pain. I wish someone had told me then - "It's ok to feel hurt and sad and scared and angry. It's good to feel those things. But it's also ok and good to have fun and feel happy sometimes. It's ok to just be a little girl. Feeling happy doesn't mean that you don't still have all those other feelings, or that you don't care about the things that are happening to you and your family, or that those things don't matter. It's not a betrayal to the people you love. You don't have to carry this huge weight and burden all the time." For years, I have felt like I've been living under a cloud. I have been! A cloud of belief that says "Life hurts. People betray you. You don't have any power. Happiness is for the people who "have". You are one of the "have-nots". Wow! No wonder I've struggled with depression! What hopeless limiting beliefs!
Now I am replacing those beliefs with
It is ok to have fun. I can be responsible and have fun too. They are not mutually exclusive.
Life can be fun.
Work can be fun.
I don't have to wait for work to make work fun - *I* can make work fun.
I can make work fun by *being* fun.
I can make work fun by being fun by being *me*.
Wow. These are messages that are striking down to the very core of who I am. They are heart beliefs, central to everything I think, feel, say, do, whether I'm aware of it or not. Changing these deep beliefs has and will have a ripple effect. Already, in just a few days, I feel so much more confident, less stressed, less anxious, free. And it shows; I've had multiple people comment on it. I told my sister yesterday that I feel like I've forgotten how to have fun (or maybe I never even knew to begin with) and I am just figuring it out again. It's a revelation that fills me with awe, wonder, and excitement.
I feel like a flower blossoming.
Or like a dragonfly, just emerging from the cocoon and discovering my wings. I have the whole sky to explore, and I can't wait to see where the wind will take me.
What DYT Has Done For Me, Part 1 - The Journey
Just as fair warning, this could get rather long. I will try not to let it go too long, but... so much has changed for me over the last week and even just the last few days; I am being flooded with new insights and realizations and they are all just bubbling up and overflowing out of me, and I just have to share!
Firstly, a tiny little background. If you are not familiar with Dressing Your Truth or Energy Profiling, it is a system designed by Carol Tuttle to outline 4 different groups, or Types, of people. Everyone fits into one of these 4 Types, but the range of expression and how it plays out is unique for each individual person. It is a really interesting way to learn more about yourself and others. That is the Energy Profiling side of things. What is really neat and unique is that Carol has taken it a step further for women and created some guidelines about how to dress based on your Type. It sounds like it might be limiting, but actually it's very freeing. The premise and foundational belief is that EVERY woman is beautiful and that when the things you wear (clothing, hairstyle, makeup, accessories, etc) are in harmony with who you are on a core level - as opposed to trying to fit a certain fashion standard or attempt to present yourself in a certain way to counterbalance perceived weakness - when your outside is reflecting your inside, it allows your true unique beauty to shine through and be a blessing to yourself and the people around you. If you haven't already, I would strongly encourage you to visit Carol's blog to learn more about it. And if you make it to the end of this post, I hope you'll see why I encourage it - because that's really what I want to talk about: how learning, accepting, and embracing my Type has affected me on a very deep core level.
I first learned about DYT almost a year ago through an online message board I participate in. It was a pretty hot topic at the time, I've always been interested in both fashion and personality profiling, and I was intrigued at the idea of combining the two. I started trying to figure out what Type I am through conversations on my message board and by following Carol's blog. I bought her Energy Profiling Bundle with her book "It's Just My Nature," then I bought her Beauty Profiling Bundle with her book "Discover Your Personal Beauty Profile". I had mostly settled that I thought I was a Type 2, the Subtle Soft woman. There was (and still is) an awful lot about that Type that really clicked for me. Then it was suggested to me that I might be a Type 1, the Bright Animated woman, and that really threw me for a loop. No way, I thought. That's not me. Of course, that very thought is actually a pretty strong indication that that IS me. Doh. I was really strongly encouraged to consider it, though, so I went back through the profiling courses, read back through both books, trying to come from a perspective of being a 1 instead of a 2. And I began to see where maybe that fit better than I thought it did. But then I had a problem - which fit more? I express a LOT of both of those movements - which one was dominant? I finally settled on T1 and have been trying to live and dress that way as best I could for most of this year. But in the back of my head, I was never entirely confident that I had gotten it "right".
Fast forward to a couple weeks ago, when Carol offered a sale on everything in her store, including the full DYT course. I'd been saving for it anyway, intending it to be a Christmas gift to myself, but the sale coincided with my birthday. I didn't have quite the full amount saved, but close enough that my husband, knowing how important it was to me, said to just go ahead and get it. Now I had a new problem. You can only get the course for one type, meaning I had to really commit to what type I am. All the questions I'd been asking in the back of my head were suddenly a really big deal. Fortunately, I am not the only one who has had this problem, and Carol and her staff are truly dedicated to supporting women in discovering and honoring their true natures. They had done a couple of conference calls earlier this year specifically for women who had been through the books, been through the online tools, and were still having trouble, and the recordings of those calls were available in my member area after I had purchased the course. I only had to listen to one of those calls. There were several things in that call that really rang true to me, and I came away from it with a new confidence and assurance that I am indeed a Type 1, Bright Animated woman. I took a deep breath and clicked on the button to choose the Type 1 course. And with that one little click, my whole world changed.
Sunday, May 1, 2011
Alpaca!

Yesterday we (me, Jimi, Gabriel, and our friend R) spent the afternoon walking around the Midwest Alpaca Festival. So. Much. FUN!!! We walked around the vendors area first, scoping out what purchases we wanted to make. I had my eyes peeled for something special for my Mom for Mother's Day (found something too!) and of course something special for me too. ; ) I didn't take any pictures up in the vendor area, although there were a couple stalls with these very lightweight sheer shawls or ponchos with fiber felted onto them in random designs - not really my taste to actually wear myself, but very very pretty. I should have taken a couple pictures of those. Oops.

What I did take lots of pictures of, was the animals. We walked all around the pens downstairs, oohing and cooing over them. Did you know alpacas hum?! And if you're petting them at the time, you can feel the vibration, kind of like a cat's purr. Totally melting over here! R and I kept saying how we'd like to bring one home with us. LOL. Someday maybe!


This one's the one I "claimed" - her name is Dr Pepper! I do love me my DP. LOL.

We got to chat a little with the owner of these two sweet sisters. The smaller fawn colored one is 8 months and the older white one is 20 months, and already being shown and bred as an adult! I laughed and said, "What do you think of that, Gabriel, she's almost the same age you are!" and the owner told us that the mama of these two had just won an award and her name was Lady Gabriel! I didn't catch what award she'd just one - there were ribbons EVERYWHERE in all different colors as people showed off their wins from all different shows, not just this one. Of course owners and breeders were making all sorts of connections, buying, selling, arranging for breeding, so all those ribbons were advertising and marketing. ; ) I didn't even try to keep track of them.


Some alpaca facts. = ) I'm so amazed about the burrs, that's just crazy! I bet you can tell pretty easy, but here's an Huacaya (pronounced wa-KI-ah, "ki" sounds like "high") -

and here is a Suri -

You can see where the names come from! Both are extremely soft, and the Suri fiber has a silky quality to it, including a bit of shine, even in the adults. Gabriel was drawn to the Suri's especially and kept pointing and reaching for them. Most of the animals were shy enough that they pulled away, though a few came up to the fences where we could pet them. And one very kind owner held one of his animals close enough to the pen for Gabriel to pet her, which just totally made his day! (We did not ask him to do this, and Gabriel is generally very good about being gentle with animals.)
By the time we walked all around all the pens (with Gabriel on my back in the mei tai the whole way, phew!), we were all tired and hungry and ready to head out. Plus we still had a walk to the car - not a terribly long walk, but we had parked a bit away from the event so we wouldn't have to pay for parking. On the walk to the car, though, we saw a whole flock of goslings. Awww.

Wednesday, April 27, 2011
A Note on Multi-Sensory Easter Baskets
Firstly, yes, I have pictures, but they aren't uploaded yet and I'm just going to seize the moment to write this while I can and edit the photos in later. Sorry.
Secondly, the background - while shopping for Gabriel's Easter basket goodies, I had a brilliant idea. (This should probably have been my first warning). See, I didn't really want to get a basket - the handle sticks up and makes it an odd shape to fit onto a shelf or anything, which makes it difficult to reuse for storage purposes after the candy is all eaten, and I really didn't want to waste money on something that was just going to get trashed. So instead, I got a small Sterilite tote and 20 pounds of rice. Figured I'd hide the plastic eggs full of candy in the rice for a nice contained easy "egg hunt" and then afterwards the tub of rice is itself a great sensory toy. Yeah.... here's my thoughts 4 days later.
1. I can see why this is a great sensory toy for little kids - I actually kinda enjoyed digging my hands through the rice.
2. I had no idea rice was so dusty.
3. Rice is the perfect size and shape to wedge itself under your fingernails (much less of a problem for my toddler).
4. I should have listened to my husband when he suggested taping the eggs shut.
5. I should have remembered to put "basket" and child in empty tub for easy clean up.
6. A Sterilite tub, even with a lid on it, is not nearly enough to contain 20 lbs of rice. Rice travels. Especially when you didn't tape the easter eggs shut.
7. Hiding candy in the rice was a bad idea. My toddler's only interest in the bucket of rice is for the candy. Which is now full of rice because I didn't tape the easter eggs shut.
8. I want to know what happened to the rest of the Reese's peanut butter bunnies. We started with 5, I ate 2, and I certainly didn't give any of those prizes to the toddler. So either my husband and the kidlet ate the other 3 when I wasn't looking (entirely likely) or else they are so well buried in the rice that even I can't find them. Either way, I'm pouting.
Sunday, April 10, 2011
There May Be Hope Yet
Hope of Spring, that is. In fact, I'm going to say we may eve have turned the corner and be well and truly done with winter. (I do hope I'm not jinxing anything by saying that.) But the weather has been quite nice, in the mid 50's for most of the week, and even up to 80 today! Plus, despite the promised thunderstorms, there hasn't been a drop of rain all day. It's actually been quite nice - a little on the muggy side but with a nice breeze to keep the air moving and make it a very nice day to be outside. Which is exactly where we've been! Tuesday or Wednesday (can't remember which day,) we went to the botanical gardens and actually saw *gasp* flowers! I only had my cell phone with me, no camera (bad mama!) so nothing outstanding for photos, but I just had to try anyway. I've been quite green with envy over all the lovely flower photos I see on everyone else's blogs these days and quite antsy waiting for some color to start popping up in my little corner of the world. Hopefully putting them all together in a collage kind of makes up for the cell phone camera? Maybe? Well I'm going to say it does. And I made the background green, because let's face it, the grass sure isn't yet. :(

In other adventures, this week, we went to the zoo on Thursday with some friends and to the park today with Daddy. And we got new shoes. Because someone was in a sharing kind of mood at the zoo.

Yup. He dropped it right into the prairie dog exhibit. Ok, to be fair, he didn't do it on purpose. I think it actually just fell off his foot. The exhibit is set up so that you stand on a ramp above the prairie dogs and look down into the exhibit. The "fence" is just a rope net. Certainly enough to keep a person out, but not, apparantly, toddler sized sneakers. Doh. Yes, we did go find someone to let them know about it so they could get it out, but I decided I'd had enough of theom falling off his feet everywhere we go and this made an excellent excuse to buy new shoes.
And just because he's so stinkin adorable, I'll leave you with a random shot of the red panda. :)

Tuesday, March 29, 2011
Fixing Crochet
This was another thing I had actually done earlier in the month, but I really wanted to share it with you. Have you ever had something handcrafted that you really loved, and then it got a hole in it? My sister gave me this afghan to fix for her last fall, but it took me a long time to figure out how to fix it. It was a wedding present from her husband's aunt, who has since passed away, so it's really special to her and she was really hoping I could find a way to fix it. Holes in crochet are not easy to fix, though, as each stitch is built on the previous stitches. And this was quite the hole.

And quite the pattern! Just figuring out the stitch pattern took me quite a while. I finally looked up the Catherine Wheel stitch pattern in a stitch dictionary, copied out the instructions for it, and used it to make a dishcloth to practice the stitch. Then I went back to the afghan and studied the specific variation of the Catherine Wheel - how many stitches in the wheel, how many chains, etc. The other thing I did right away was to pull the long yarn tail through all of the loose stitches and knot it to the short tail. It meant when I went to do the actual work, I had less yarn to work with, but it also meant that I didn't have to worry about additional stitches pulling out.

When it came to actually putting the missing stitches back in, it was a slow process. Basically what I did is to do 1 stitch take the loop off the hook and insert the hook through the loops of the stitch in the row above, then pull the loop of the stitch I just completed through the stitch above it. I bet that's about clear as mud. In the picture above, you can see the hook inserted through the stitch in the next row, and the loop of the stitch I just completed hanging down below the hook.
I had to be very careful with my counting to be sure that I was putting the right number of stitches in the right places - fortunately, it was pretty easy to tell where the stitches should work into, since those places were stretched out. : )

I did run out of yarn and had to finish off with some yarn I had on hand, so there is that small patch where the color is a little off. I didn't really want to run around trying to find an exact color match and then end up with an entire skein of yarn left over for just that tiny amount. You can certainly see where the "patch" is and you can tell the difference between my stitches and the original work if you are looking for it - but all in all, I'd say that's a pretty good fix, and an accomplishment to have figured out the solution all on my own! And the method could be applied to I think just about any crochet piece. All it takes is a little patience.

And quite the pattern! Just figuring out the stitch pattern took me quite a while. I finally looked up the Catherine Wheel stitch pattern in a stitch dictionary, copied out the instructions for it, and used it to make a dishcloth to practice the stitch. Then I went back to the afghan and studied the specific variation of the Catherine Wheel - how many stitches in the wheel, how many chains, etc. The other thing I did right away was to pull the long yarn tail through all of the loose stitches and knot it to the short tail. It meant when I went to do the actual work, I had less yarn to work with, but it also meant that I didn't have to worry about additional stitches pulling out.

When it came to actually putting the missing stitches back in, it was a slow process. Basically what I did is to do 1 stitch take the loop off the hook and insert the hook through the loops of the stitch in the row above, then pull the loop of the stitch I just completed through the stitch above it. I bet that's about clear as mud. In the picture above, you can see the hook inserted through the stitch in the next row, and the loop of the stitch I just completed hanging down below the hook.
 |
| Grab the loop of the just completed stitch and pull it through |
 |
| Turn the hook around and work next stitch |
I had to be very careful with my counting to be sure that I was putting the right number of stitches in the right places - fortunately, it was pretty easy to tell where the stitches should work into, since those places were stretched out. : )

I did run out of yarn and had to finish off with some yarn I had on hand, so there is that small patch where the color is a little off. I didn't really want to run around trying to find an exact color match and then end up with an entire skein of yarn left over for just that tiny amount. You can certainly see where the "patch" is and you can tell the difference between my stitches and the original work if you are looking for it - but all in all, I'd say that's a pretty good fix, and an accomplishment to have figured out the solution all on my own! And the method could be applied to I think just about any crochet piece. All it takes is a little patience.
Monday, March 28, 2011
Time Machine, Pt 2 (Magic Yarn Swap)
 |
| All the goodies! |
 |
| Made this bag and there's a deck of cards inside |
 |
| Made this bag, too, and the gingerbread spice candles were something I'd made previously and had on hand |
 |
| Double ended stitch markers for knitting or crocheting |
 |
| Everything wrapped up and boxed up |
I had such a hard time choosing the yarn and pattern for this package. We each filled out a questionnaire about our interests and favorite colors, yarns, etc. but we were supposed to keep it a secret whose name we had, so that it was a surprise when we received our yarn. I never thought it would be so hard to pick out a pattern and yarn for another person! She really liked it, though, and said she'd actually been needing a new handbag, so it worked out great. This was also the swap I did the needle roll for, and she hadn't had anything to keep her needles in before that, so she loved that too. Phew!
And of course, I have to share what I received. : ) I'm only going to share 1 shot of everything once I had it all unwrapped, because I don't have any really good shots. I couldn't find the camera when I was unwrapping the yarn, and didn't have the patience to look for it, so I just used my cell phone. The pattern is a lariat necklace / scarf using crochet thread, but I'll share more about that when I finish making it.
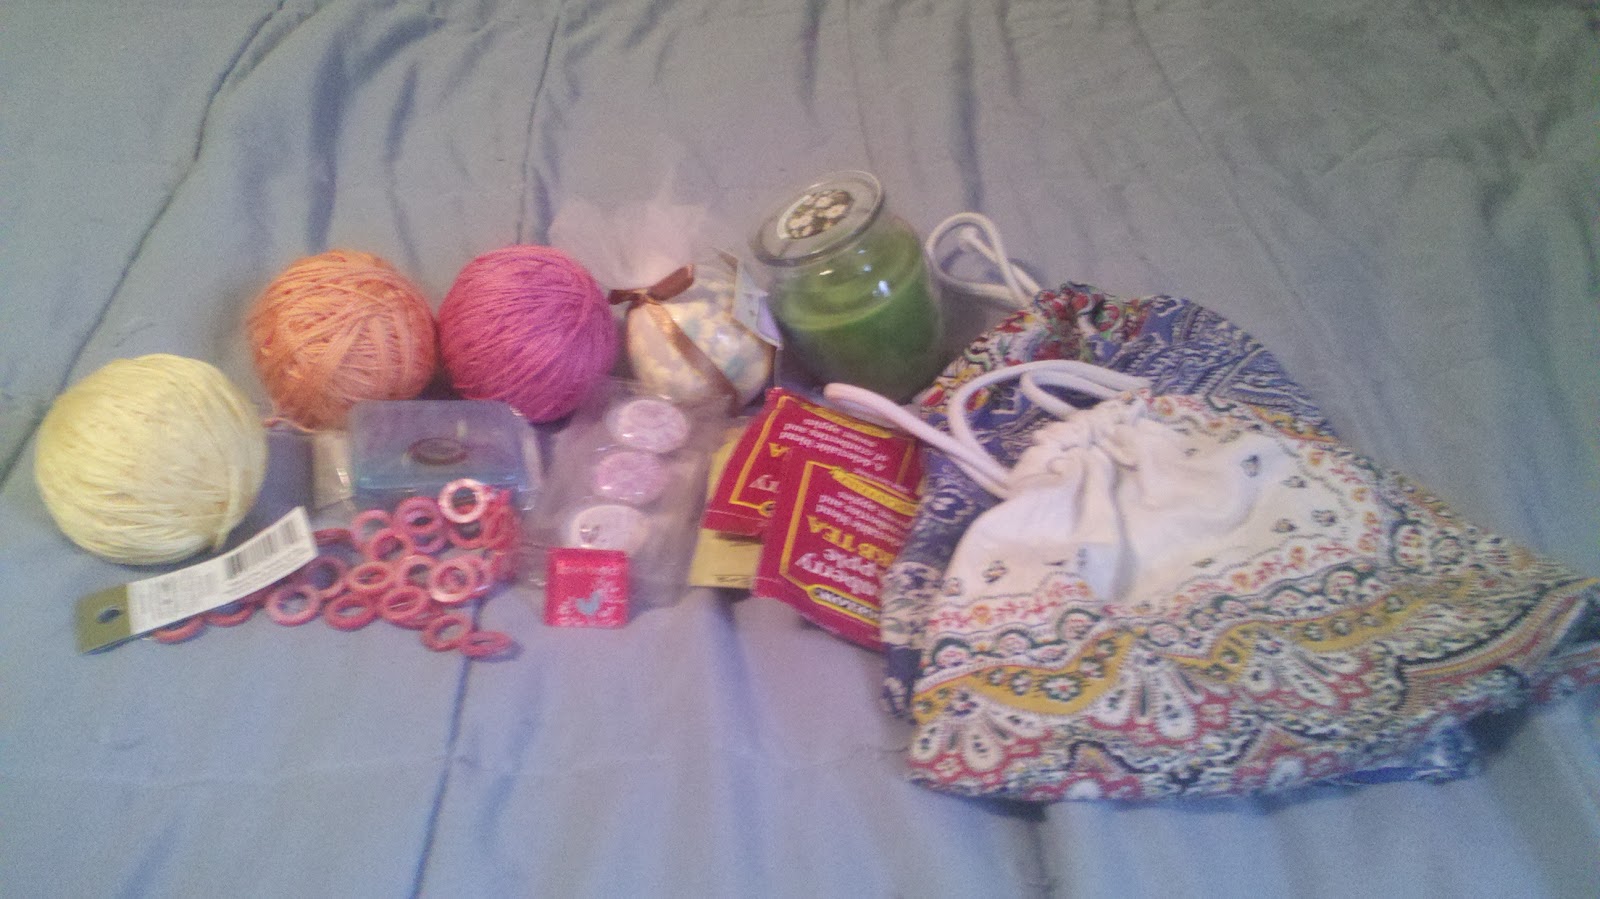
There's 3 different colors of crochet thread which will be wonderful for making jewelry; a bath fizzy; a spring meadow scented candle (which I keep going back to, it's just loverly, ahhhh); some beads; a pink charm that says "love hard"; a package of stitch markers; a package of really pretty pink swirly magnets; an assortment of tea; and a couple drawstring bags. Those bags especially are going to be super useful, I'm always looking for little bags like that to keep things organized in my project bag. And I'm so excited to use the thread, beads, and charm to make some really pretty jewelry!
Sunday, March 27, 2011
Time Machine, Pt 1
You may have noticed I haven't posted in a while... like all month... *blush* I have been taking photos, though, so we're just going to pretend I'm posting these on time, all right? You good with that? Oh good, I knew you would be. : ) I'm also going to try to write up a few posts now while I have time, and schedule them to post later in the week. A little experiment! We'll see if that works out. ; )
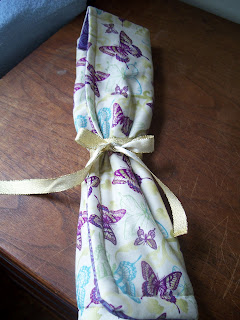

So for this post, I just wanted to share a couple quick projects that I'm rather proud of. This was a knitting needle roll that I sewed to send to someone in a magic yarn swap (more about that later this week!) I'm really proud of it because I do not sew. This was pretty easy, though, it came together in just a few hours and was relatively painless. There's 3 layers of pockets with different sized slots for needles and notions. It was easy enough, I even made a few changes to the tutorial and made a crochet hook case for another gift! The link for the tutorial I used is here.


The other project I wanted to share is this mix and match bracelet. It's actually 3 bracelets, with lobster clasps at each end. The lobster clasps clip onto the rings of the magnetic clasp, so you can take them on and off easily to choose which bracelets you want to wear together - 1, 2, or all 3! I really love magnetic clasps for bracelets, since they're easy to put it on yourself. This was for another swap, but I really like it, so I think I'll be making another one for myself.
Tuesday, March 1, 2011
Fishy Fishy

Would you believe that picture is the inside of a table? It is! Here, I'll zoom out a little and show you the edges -


The edge of the picture is covered in gold foil, and then there's shells all around that. You can see the lights from the window reflected in the table top, too. Obviously, this isn't an actual aquarium. It's more a light box - you have to push a button and it lights up from the bottom, everything is translucent so the light shines through it, and some of the fish move, scrolling across from left to right. I was actually surprised how well these photos turned out, especially considering I didn't have my camera with me so these are from my phone.
Oh, I suppose you'd like to know what type of place has tables like this? It's Ella's Deli, of course. My sis came for a visit last wee and took Mom, me, and the little one there for a snack of fried pickles and ice cream sundaes (two separate dishes!). And no, she is not pregnant. She just was wanting fried pickles, and you can't go to Ella's without getting ice cream. *giggle* You can see more photos from Ella's in this post. I can't wait for it to warm up enough for them to open up the carousel!
Monday, February 28, 2011
A Quick Peek

It still needs lining, actually, both of these still need lining, so quite a full ta-dah post yet, but the crochet is finished, all the ends sewn in, and all the pieces sewn on. I finished off the top of the 3Rs bag by turning the 3rd round of the pink into a straight edge following some advice from one of the lovely ladies on the We Love Lucy Ravelry group. And oh I can't believe I didn't somehow make note of the blog post where she explained how she turned the edge of her ripple into straight - of course hers was the ripple blanket, but we were both using Lucy's neat ripple pattern, and it worked perfectly on my bag. Anyway, then I topped that off with the yellow shell edging, added a couple flowers and the straps, and that's it! That smaller bag in the corner, with the straight stripes, that is a makeup case, which you can find the pattern for it here. That'll be my hook/notions case, as the 3Rs bag is going to be a project bag.
And now it's bedtime for a certain little boy, well past it actually - I'll have to come back and edit in the links for the patterns later after he's asleep. TTFN - ta ta for now!
PS - I'm so much happier with this photo than with the yucky no light ones from last week. And I actually made an attempt at composition! Go me!
PPS - Took me til this morning, but the links are in now. Enjoy!
Wednesday, February 23, 2011
Oops

I almost missed posting a photo from last week - well I almost missed taking a photo last week too. I thought I only managed to get 1, but when I went to get it off my phone, I did discover 2 more that I had forgotten about. They hardly count though, just quick shots of my mother trying on new glasses. Sad. Only 1 photo and it's taken with my phone. *Shakes head* I will really have to do better this week.
Still, the photo's not all bad. Doesn't that pie look just delicious? It totally was. Strawberry truffle, mmmm-mm. *Licks lips* Jimi and I shared it for dessert after our lunch date on Valentine's Day. I could have eaten it all myself, though, soooo yummy. But sharing is nice too. : )
I did realize at some point last week that I have been somewhat failing on the photo front all along. I mean, the point of taking so many photographs is kind of to improve your photography skills, something I have made absolutely no attempt at so far. Doh. It's true that doing this Project 52 has helped push me to take more photos and to post more regularly, so that's something. And in my defense, natural light around here is something of a myth, something I used to know about but couldn't begin to guess where to actually find it these days... ok, maybe that's exaggerating a bit, but really, February in Wisconsin is quite gray and dreary and not at all nice for taking bright colorful well-lit pictures. : P But regardless, I shall begin to put more effort into taking better photos and not just snapping something at the last minute so I can say I did it. *blush*
And on the crochet front... well it feels like I've got a million projects on the go, all of them right at that stage where they are close enough to done that all that's left is the fiddly bits and no actual hooking. : ( That's a little exaggerated, too, I guess. I've got a few projects done and just needing photos and care labels. My hook case for my 3R's bag just needs lining sewn in - the lining is cut out, but there is some question as to if we got it sized appropriately and it is frustrating me no end. The bag itself is agonizingly close to being done and yet feels so far yet - actually, it just needs the straps and flowers and leaves sewn on. Got one strap sewn on last night and then discovered it was twisted, so I have to cut free one end of it and redo that. Doh. And make 2 more flowers and all the leaves. I'm hoping to get most if not all of that finished up today, certainly by the end of the week. Won't be 100% this week though, as I don't expect to get the lining in it. And then on top of all that, I've got 2 jewelry projects I need to be working on, one about halfway done and the other not even started. And that's just the "priority" stuff - I've got at least 4 or 5 more projects lined up that I'm waiting to start on until most/all of these current ones are finished. Whew!
Sunday, February 13, 2011
R2 and R3

I do apologize for the awful photo. I once again left it for the last minute, which meant I was taking it last night, well after dark. I'm only sharing 1 today despite taking several because they are all just so blech. But anyway... here is the bag part of my 3R's bag and you can see that R2 and R3 are Ripples and Ridges. Sorry to keep you waiting so long for this little mini reveal! I have to say, the concept for the ridges came from an ad in the back of a crochet magazine which was for a pattern book of Bavarian crochet offered by Annie's Attic. I fell totally in love with the designs and hurried to look up Bavarian crochet online... well, it's basically just a Catherine wheel pattern with back post stitches to give the ridged effect. To which I said, oh, post stitches, well I can do that, and adapted the idea to this ripple... Um, I think I like the diamond-y pattern it creates on the Catherine wheel better. I do like this, it's very unique, but... the bag has turned out rather larger than I anticipated (I'm not bad at math, but I still managed to mess it up. Fixable, but the bag is HUGE) and I am starting to get rather over it at this point. Ah well. I am forced to a bit of a break as I've run out of the yellow yarn and the store that carries it is closed on Sundays. But I'm almost to the end of the 2nd row of yellow, then 1 more round of yellow, 3 rounds of pink, and I'll be ready for Finishing Touches - an edge (how do you edge a ripple?), straps, and lovely little flowers. Those ought to go quite quickly, I would think, so with some luck, I'll have a full ta-dah! post next weekend.
Sunday, February 6, 2011
Catching Up

*Sigh* Once again, it is Sunday morning and I am only just now finding the time/peace/quiet to get a post written. This is I think the 3rd week in a row, so it's starting to turn into a pattern. I really wanted to post several different things this week, but just haven't had a chance to sit down and type it all out. So this is actually going to cover about 3-4 different posts of things I wanted to share this week. Oh well, better than never posting at all, I suppose, and at least this week I managed to get photos taken during the week so I wasn't scrambling to do that yesterday afternoon.
So anyway, first things first - isn't my little guy up there just adorable? That's his very own yarn and crochet hook, by the way. The idea being that if he has his own to play with, he will stay out of mine. It even kind of works, sometimes. LOL. I joke that it's easy to tell what his parent's hobbies are, just by looking at what his favorite toys are. Guitars are definitely number 1, he loves to play Rock Band with Daddy. He has his own little toy guitar of course, but he also plays the RB controllers, a little 3 inch Christmas ornament guitar, and if none of those are around, he'll happily substitute anything vaguely guitar shaped, such as the baby monitor - which is guitar shaped only in that it has a larger "body" and a long "neck" (the antenna). LOL. Anyway, yarn is also pretty high on his list of fabulous toys. I have to be careful taking him to a store, as he wants to squish and dig his fingers into every single skein. And it's kind of a relief to have him so focused on guitars now, because for a long time there was absolutely no way I could crochet at all if he was around and awake. Unless I wanted to stop after every other stitch to chase him out of my yarn or untangle him, or take away the scissors... you get the idea. ; )


So, on to the Lucy bag. I was going to share with you R2 and R3, but I realized that I didn't actually take those photos. Oops. Well, you can see that I got the base done, and it's not so round as I might like, but... oh well, it's going to be full of yarn when it's finished, so whatever. It does make me a little anxious how the lining is going to work out, though. I've made quite a bit of progress since this photo, I just started the first yellow stripe last night. I've made a couple little variations on the original Lucy bag, which I'll reveal this week with the last 2 R's and will explain why I'm calling it my 3Rs bag, but it means that each color stripe is 3 rounds instead of 1. I think it's turning out quite well, I'm excited to see it taking place. The fabric there on the right is going to be the lining, and it's flannel, so it's soft and sturdy. I do love flannel. The pink fat quarter is going to be for pockets, because I have to have pockets, and to line a little bag I made from this makeup case pattern. The zipper is for the little bag, which I just realized I need to get pictures of that too. Doh. I guess I know my assignment for this week!

Another little thing making me happy - besides that pretty pretty flannel - I got this book this week for 30% off! I've flipped through it before, and dithered about buying it, (buy it? or just get it from the library as needed? hmmm... ) but just couldn't afford it at the time - then when I had the money and decided I did want to go ahead and actually buy it to have it on hand because there are just so many FABULOUS flower patterns in it... well by then, I couldn't find it anywhere! :( So it was a very nice surprise to see it in the pattern racks at JoAnns this week and during a rare sale on books and patterns AND I happened to have the money to spare for it.... Oh happy! I've been so involved in the bag project, I haven't actually even looked through it again yet, but I'm happy just to know that it's in my drawer with my other patterns and books, waiting patiently for me to need whatever sort of flowers I can imagine. Which will be soon - I am really wanting some new hair clips, and I'm sure there will be the perfect flower(s) here just waiting for me to steal a few minutes to make them. Happy sigh. : )

And to wrap things up... I promised to reveal the finished project of those little flowers and leaves once it had been delivered to the person I made it for. I'm quite pleased with how it turned out. The card with the writing on it is slipped into clear photo corners rather than fastened down, so the text can be rotated to face any direction and the whole thing can hang vertical or horizontal. It took me AGES to decide what to make for this friend - I had the quote and a color palette and a concept of flowers to work with and pretty much free reign beyond that - but once I saw Alice's patterns for the flowers and leaves, I knew they were exactly what I needed, and everything fell into place pretty quickly after that. I was extremely pleased to have it finished and mailed off, since it had been on the list to do for over a year. And my friend tells me she loves it too, so that's quite a relief! I don't think it's likely I'll be making much in the way of more wall art any time soon, the painting is too time/space intensive, but I'm happy with how this turned out to know that crocheting small bits is a good/fast alternative to the painting, and certainly unique, not something you see every day. It's something to keep in the back of my head for an option for projects, you know?
All right, loveys, I need to wrap up, I've got another trip to JoAnns planned for this morning (glee!) and work this afternoon and Jimi has stuff he needs to take care of... the weekends are never long enough. I will try to post again before next week, but if I don't manage it... have a good week!
Sunday, January 30, 2011
Monday, January 24, 2011
Picot Love
I have a confession. I don't really like the picot crochet stitch. I know, it's a pretty common one in edgings and what not, but I don't really like it. I think it's because I don't really like slip stitches. But all that has changed. One pattern, that's all it took - well, two really, but they are related. Such an easy, quick little pattern. But so satisfying, and it's all about the picot. Such perfectly pointy little picots. My whole world is changed. Ok, maybe that is just slightly exaggerating. Maybe. I suppose you want to see?

See? Such pretty little flowers and leaves, so nice and pointy and perfect. The pattern for both the leaves and the flowers is from Alice over at Crochet with Raymond, and I cannot thank her enough for them. Really, I have had a project that I have been working on for over a year and which I was feeling quite anxious over. It was promised to a friend, you see, and I wanted it to really be something special, especially since it was taking so long. But I just had no inspiration. I made several false starts, but nothing was right. As soon as I saw Alice's little leaves, though, I fell in love. And then the next day she posted the flowers, and that was all I needed. Everything else just fell into place from there.

I have to say, sewing all the ends in on these tiny little thread flowers took some time. But it was worth it, they are all just gorgeous, don't you think so? I can't share the final project yet - it's done, HOORAY, but it just wouldn't be fair to go posting it all over before my friend gets to see it herself, you know? But I thought I would share the little flowers at least. I did enjoy hooking them, I got quite a little rhythm going. half double, double, half treble, PICOT! half treble, double, half double, slip. Over and over in my head all around the flowers.

Oh, if you look closely, you may notice that the two different colors of leaves are slightly different. The dark green ones are following the pattern exactly. On the light green ones, I changed it just slightly to make the stitches on the second side mirror the stitches on the first side. It just makes the second side a tiny bit rounder. I really like it both ways.
Monday, January 17, 2011
Jewelry With a Hook


These are a couple of my favorites from the section on necklaces. Think of all the possibilities for that charm cover! There is also a pattern for 4 different styles of "chain" to hang it off of. I love options!


These rings are a great way to use random or unique buttons, and again, the possibilities are endless. And speaking of unique - that Space Age bracelet uses monofilament fishing line for a really distinct look. I love experimenting with crochet using unexpected materials, but this is one I would not have thought of on my own. Awesome!


I forgot to take a picture of the chapter page for the Lobes and Lapels - the chapter on earrings and brooches. And I guess none of the brooches really stood out enough for me to want to photo them, though there are some really pretty ones in the book. And anyway, I don't want to totally overload you with photos, especially since I haven't been able to figure out how to lay them out any other way than 1 at a time. Still working on that. Anyway, I really like those Silver Spirals, which is just one of the earring/necklace sets. There's a couple of patterns that are basically for crocheted beads, which you can then assemble any way you want. And there's a Daisy Chain necklace which, although it isn't intended to match with these leaf earrings, I think they'd go great together. You could even make a charm bracelet with these for a complete set!
All in all, there are so many possibilities, and I am so excited to start trying these patterns. The only trouble is deciding which one to try first!
Subscribe to:
Posts (Atom)